How do you look for space on attack?
What are the spaces that you can really exploit?
There are many different triggers an attacking side will look for – it might be an obvious mismatch, or a situation where one defender is clearly out of alignment with the players alongside him.
Against a defence which is still well-organized, one of the most reliable methods of attack is to seek out the so-called ‘transition zones’ between a forward and a back.
Why can transition zones be vulnerable? The answer is that they pair up two defenders who often have very different characteristics in terms of speed, power and acceleration. Any gap that appears between a forward and a back is likely to widen more quickly under pressure than one between two comparable players – say two centres, or two back-rowers.
A simple example occurred in the recent Super Rugby Aotearoa game between the Chiefs and the Crusaders:
The Chiefs number 10 Damian McKenzie passes the ball to All Blacks centre Anton Lienert-Brown, who immediately recognizes an opportunity to run into the gap between a forward (Crusaders number 7 Tom Sanders) and a back (number 13 Leicester Fainga’anuku).
It is not just a matter of running between two defenders who operate at different running speeds: their instincts are different too. Sanders is more used to making front-on tackles in a short area against fellow forwards, Fainga’anuku wants to protect the wide channels and link up with the outside backs. Sanders squares up, but Fainga’anuku turns out towards the touch-line:

In the U.K, the Exeter Chiefs are very good at locating transition zones because of their tendency to alternate between one-out forward drives off 9, and second man plays off 12 utilizing the full width of the field.
There are in fact, two transition zones which can be exploited, a ‘short’ transition zone, and a ‘long’ version.
This example of a short transition zone comes from the Gallagher Premiership game between Exeter and Harlequins. It is ‘short’ because the Chiefs can find it after one pass from the base of the ruck. The scrum-half passes to a big forward ball-carrier (Dave Ewers), and he aims straight for the gap between the last forward (Quins number 8 Alex Dombrandt) and the first back (number 10 Marcus Smith).
Ewers angles his run out towards Smith and this immediately creates a problem for the transition zone defence:
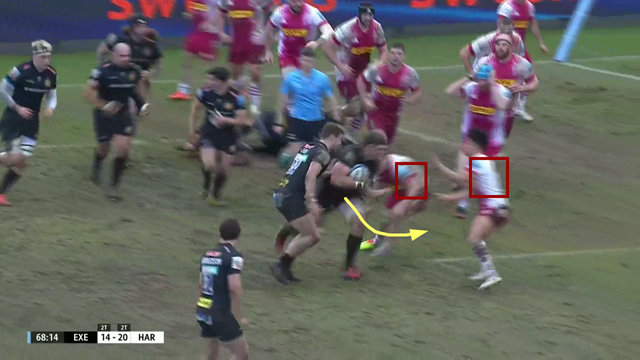
As a quicker back, Marcus Smith does not want to be absorbed in the tackle on a forward. He wants to be free to join up with the defensive line on the next phase, so passes off Ewers to the inside man. This commits Dombrandt to making the stop on Ewers by reaching for him with his arms, in a situation where he is unable to apply his power square to the target.
The ‘long’ transition zone example comes from the European Champions Cup quarter final between Exeter and Leinster:
The transition zone is long because it occurs opposite the second pass rather than the first:
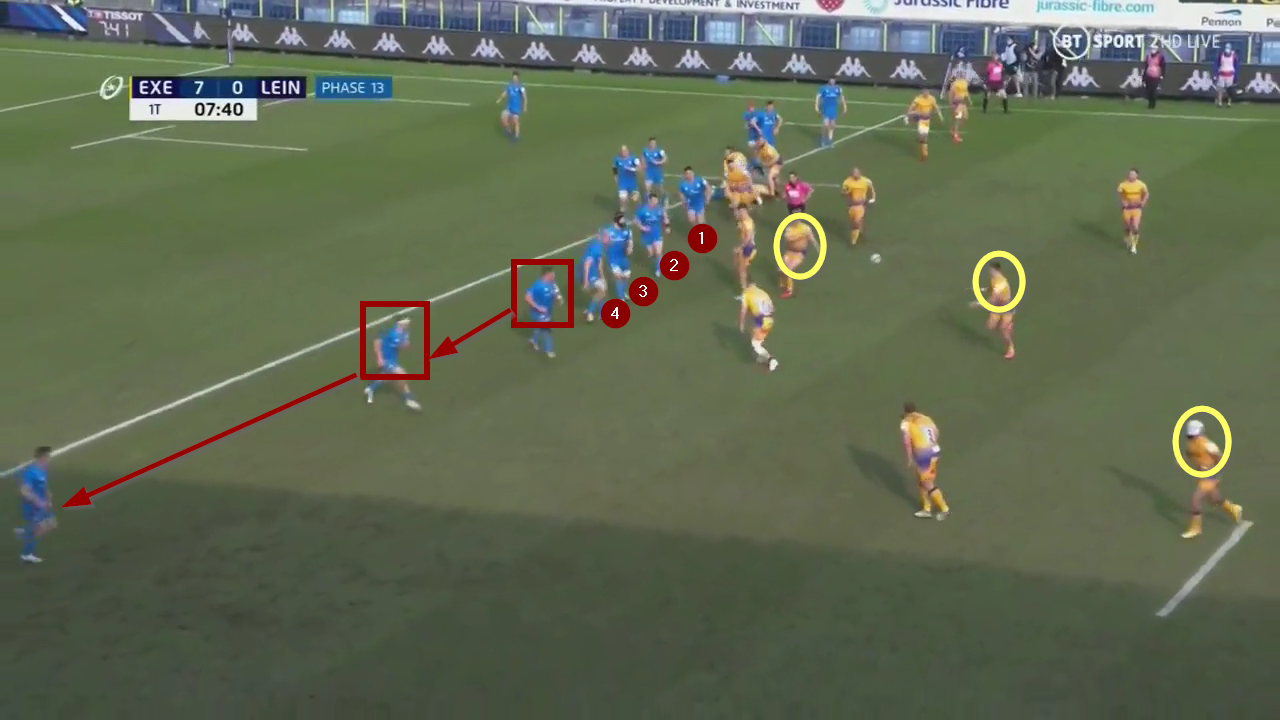
As in the Chiefs-Crusaders instance, the potential back-line receivers (in the yellow circles) are all set quite deep, so that the ball can reach them without any defensive interference.
The Leinster defence is dense near the ruck, but here are two gaps further out: the first, between Ireland and Lions prop Tadhg Furlong and centre Rory O’Loughlin (in the two red squares), the second between O’Loughlin and his wing (Jordan Larmour). Although the gap between the two backs is twice as wide as the one between Furlong and O’Loughlin, it is the transition zone between the forward and the back that the Chiefs select as their target.
When the Chiefs’ centre Henry Slade begins an arcing run, the same problem that occurred between Sanders and Fainga’anuku repeats itself. Even though he is one of the quickest tight-head props in the world, Furlong cannot keep pace with Slade from the inside, and O’Loughlin’s instinct is to move out and link up with the defence in the wide channels. Therefore, he is unable to help out when Slade makes the break underneath him.
Summary
Transition zones remain a reliable target area for teams who are capable of changing the point of attack quickly. Even when the zone appears quite close to the ruck, there is a palpable sense of uncertainty about who should be making the tackle when an attacker begins to run into the space between a forward and a back. They are typically much bigger than they appear, and represent more real space than the wider spacings further out.


.jpg)
.jpg)