How to slice the defence up with the 6+1 from lineout!
What do you do when you have established a lineout position deep inside the opposition 22?
If you have a big physical advantage over the opposition forwards, you can simply use the catch-and-drive, and try to batter your way over the goal-line.
Most teams at elite level don’t enjoy a decisive physical advantage, but they can still use the threat of the drive as the basis for their attacking play, and create variations around it.
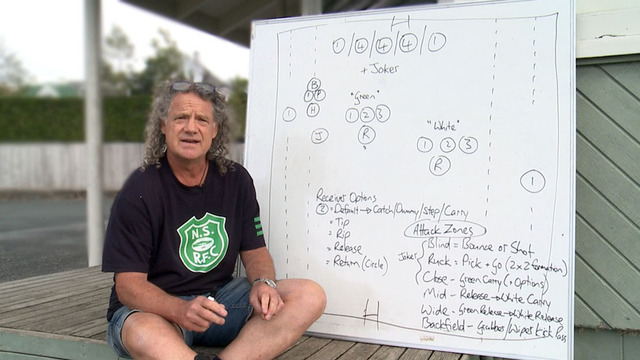
The most popular formation at the start of the drive is probably the ‘Six-plus-One’. There are six forwards in the lineout itself, the hooker throwing the ball in from touch, while the eighth forward (typically the open-side flanker) is standing out as the acting scrum-half.
If you have good ball-players at hooker and at acting half-back, there are a number of attractive attacking options you can use to engage the fringe defence and create try-scoring holes.
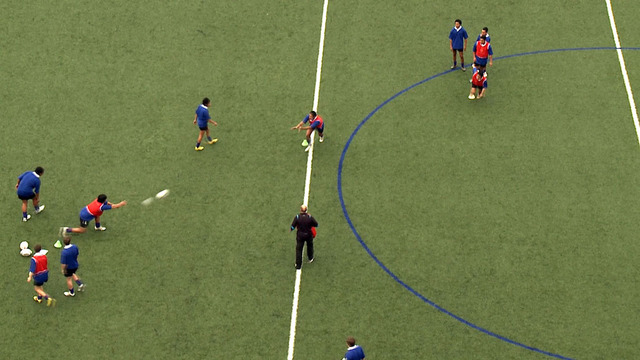
The Queensland Reds gave an excellent summary of some the basic possibilities in their recent Super Rugby Australia game against the Western Force.
Their attacking pattern was designed to create threats on both edges of the lineout immediately after the ball was won:
Firstly, the ball is caught rather then delivered off the top of the lineout. This has the effect of condensing the opposition forwards around the ball in expectation of a catch-and-drive.
Secondly, there are players in motion to both sides of the lineout. After taking the ball from the receiver, the Queensland number 7 (Fraser McReight, in the red and white headgear) looks to move to the blind-side with his scrum-half (#9 Tate McDermott). The hooker (#2 Brandon Paenga-Amosa) and the blind-side wing (#14 Jordan Petaia) are meanwhile crossing in the other direction, towards the open-side edge:

The threat of the drive is strong enough to persuade the first open-side defender (#6 Fergus Lee-Warner) to commit to the drive, and that opens the space for Paenga-Amosa and Petaia to exploit.
A second variation of the basic pattern occurred later in the half, on the opposite side of the field:
Having been burned once, on this occasion Lee-Warner is a lot more circumspect about sticking his head into the defensive maul! He opts to stay out in the line, but the Reds have another answer ready once Paenga-Amosa reads his intent. The hooker passes the ball outside to his number 12 Hamish Stewart, coming on a hard ‘unders’ angle to burst across the gain-line.
Obviously if you have a very powerful inside centre (or second five eighth) this becomes an even more inviting option. However, the Reds passed up another attractive possibility on this occasion:

With Lee-Warner defending wider on the other side, there was a nice opportunity here for McReight to keep the ball, and test the defence of the Force half-back in the tram-lines (#9 Ian Prior) along with Tate McDermott.
A third example showed that overwhelming power in the drive is not necessary to create scoring opportunities in the red zone. All you need is enough power to interest the fringe defence before releasing the ball.
I have split the lineout into two segments:
In this instance, McReight and Paenga-Amosa hold the ball in and become part of the drive. As the maul develops, it becomes clear that the Reds are not consumed by the effort to muscle the ball over the goal-line.
Their forwards are shuffling laterally to the right, looking to engage the fringe defender on that side (#7 Kane Koteka). After ten seconds, they achieve their aim:

At 15:05 on the game clock, Koteka sells himself to the drive, and that is the cue for the ball to be released to the backs:
Once Koteka has been committed, the Reds #10 James O’Connor pulls his opposite number wide before delivering an inside pass to the blind-side wing (#11 Filipo Daugunu).
In other words, he is attacking the space which has just been created, giving Daugunu a one versus one against the Force full-back only a couple of metres from the goal-line. For a winger with Daugunu’s footwork, that represents a ‘gimme’.
You don’t need an overpowering lineout drive to utilize the 6+1 effectively in the opponent’s red zone. All you need is a drive which is strong enough to keep the defence honest for you to explore your full repertoire of moves against the fringe defence!


.jpg)
.jpg)