A couple of months ago I wrote an article based on the Heineken Champions Cup final between Leinster and La Rochelle, illustrating the French club’s ever-growing control of the Leinster exit strategy in the second half of the game how to control the opposition exit strategy and play the game in the right areas of the field. The piece focused on how Stade Rochelais were able to force Leinster’s main exit kicker (James Lowe), to launch from the areas of the field where he did not want to be, or under pressure he did not want to be experiencing. It was tactical manipulation par excellence.
It is only fair to balance the account by showing some examples from another match in which the opposite occurred. In the All Blacks’ second round game of the Rugby Championship versus the Springboks, their first half scoring spree was founded squarely on the complete domination of their exit strategy against the South African return team.
In the decisive first quarter, all New Zealand’s first four exits from South African restarts produced a turnover in their favour. It was not until the 39th minute of the first half that the Boks were able to achieve a positive outcome from the kick-off, and by that time they were on their knees at 20 points to 3 down on the scoreboard.
South Africa’s primary idea from their own restarts was to pin New Zealand down in their left corner, deep within the 22. The All Blacks lacked a natural left-footed kicker who could find the same length to the left side-line as James Lowe achieved for Leinster early in the Champion’s Cup final.
If the All Blacks had to rely on Aaron Smith’s box-kicks, or a right-footed kicker clearing to the left side-line, the Springboks would have been banking on achieving several attacking lineout positions in the New Zealand half of the field.
How did the All Blacks break that pattern before it ever became established? The return from the opening kick-off of the game gave all the essential clues. After left wing Mark Telea made the initial receipt, New Zealand used their most productive forward ball-carrier on the day (#6 Shannon Frizell) to move the ball further out to centre-field, before launching a long ‘bomb’ out to the far side beyond halfway:
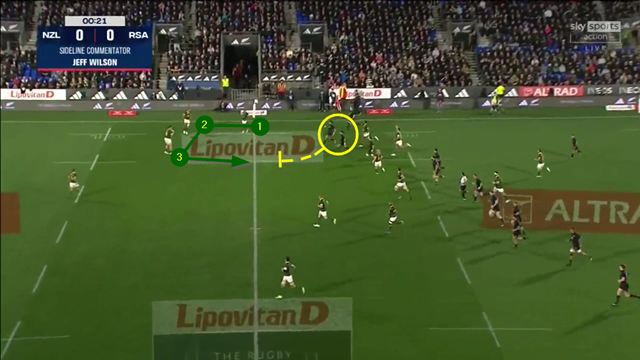
There are two tasty items on the All Blacks’ menu. They are using their nominal full-back Beauden Barrett – who has plenty of experience in the national jersey at #10 – to kick, with the first-five-eighth (Richie Mo’unga) to his right as the main chaser. They are also using their exit to take the ball away from South Africa’s full-back Willie Le Roux, who is defending against the box-kick, and attack the return triangle of #11 Makazole Mapimpi [“1”], #10 Damian Willemse [“2”] and #8 Jasper Wiese [“3”] on the far side of the field:

Why? They know that Willemse can be suspect receiving the ball in the air, and they know that Wiese’s ball-retention can be suspect taking it up into contact. In this case, Mo’unga leads the chase-line upfield and dislodges the ball in a tackle on the big Springbok #8, forcing a knock-on and a turnover scrum.
The second exit in the 7th minute resulted in a penalty to New Zealand after Telea’s initial run drew a penalty for offside, while the third (four minutes later) exploited Willemse’s lack of conviction in the air:
Once again, it’s the same arrangement in place – a carry by Frizell into midfield, with the roles of Barrett and Mo’unga swapped on the kick/chase. In this instance, Barrett varies the length of his punt so that it drops into the ‘corridor of uncertainty’ between a retreating defender (Mapimpi) and an advancing receiver (Willemse) with perfect precision.
The final example, in the 18th minute, displayed the full range of New Zealand’s options out of this flexible formation:
In this example, Frizell passes from the forward pod instead of running, and Barrett and Mo’unga link smoothly to spin the ball out to the right. Although the movement with ball in hand is contained, the long box-kick by ‘Nugget’ again finds the weakest links in the chain, with a poor pass from touch drawing a knock forward by Wiese.
Two of the most high-profile games of the last three months – the Champions Cup final in Europe between La Rochelle and Leinster, and the Rugby Championship ‘decider’ between New Zealand and South Africa – have shown the importance of a successful exit strategy.
Summary
When under pressure (Champions Cup) it become impossible to control territory; when it bounces that pressure back on to the opponent (New Zealand vs. South Africa), it allows freedom and relaxation in attacking situations further upfield. It is the small nuts and bolts which enable the big engine to purr into life, and you cannot beat a smart exit – or for that matter a Mount Smart exit – to rev it up.


.jpg)


.jpg)